

❶ To create an Azure account, visit the “Clouding Computing Services | Microsoft Azure” site at https://azure.microsoft.com/, if you don’t already have one.
Azure may ask for credit card information. You’ll need to provide a valid card, including the CVV code. I created my account a few years ago, used it for a few days, and then left it inactive. When I accessed it again in June 2024, my credit card had already expired, and Azure requested an update. I haven’t been charged anything yet. I believe that even if we do get charged, it operates on a pay-as-you-go scheme. (I was charged several times by Amazon Web Services, but all charges were under 50 cents.)
❷ Create an Azure project to obtain theAPI Key and the
Location/Region. Please note:
-
We are provided with two keys,
KEY 1andKEY 2. We only need to useKEY 1in the program code. -
At runtime, the value of
KEY 1is assigned to the environment variable namedSPEECH_KEY, and the value ofLocation/Regionis assigned to theSPEECH_REGIONenvironment variable.
I had already created a project prior to this post. I created another one to take screenshots for this post.
⓵ Visit https://portal.azure.com/. You will be greeted with a screen similar to the screenshot below:

Click on the + Create a resource icon to continue.
⓶ On the next screen, type speech into the
search box and press the Enter key. From the results list,
under Speech Microsoft Azure Service, click on the
Create ˅ link and select Speech. This is illustrated
in the following screenshot:

⓷ On the next screen, titled Create Speech Services, fill in
the form as illustrated in the screenshot below:

Please note the following:
● For the Subscription * field: There seems to be only a single dropdown entry.
● For the Resource group * field: I used the
Create new link to create a new entry.
● As mentioned above, I had already created a project prior to this, and the
Region for this project is also Australia East.
Hence, the notice about being unable to select the free tier (F0) pricing.
● For the Pricing tier * field: Please select
Free (F0) – you should have this option in your list.
⓸ Click on the Review + create button. This will bring up
the summary screen as illustrated below:
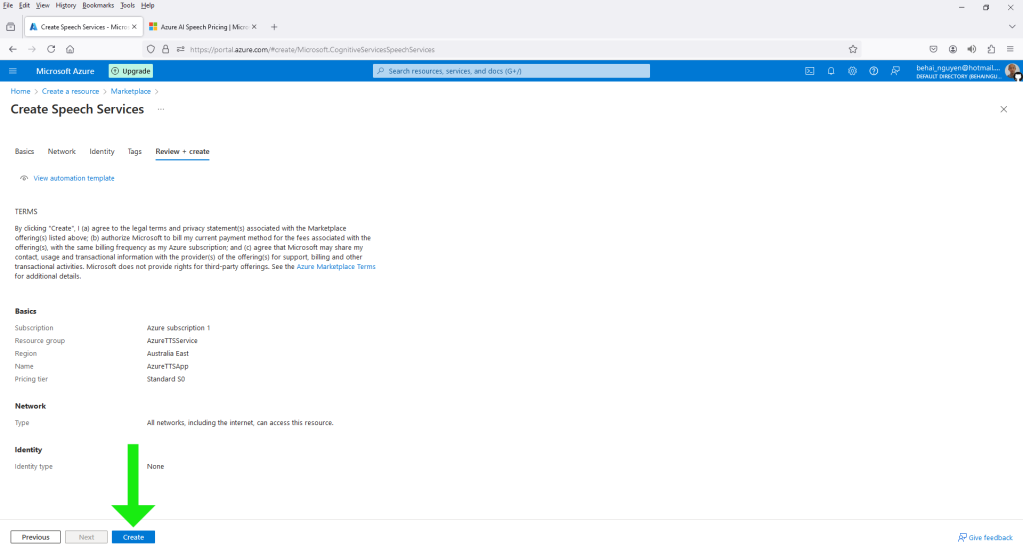
⓹ Click on the Create button to create the project.
This will take you to a new screen, as shown in the screenshot below:

⓺ Click on Go to resource to proceed. The next screen is shown below:

⓻ As mentioned at the start of this section, we only need the
KEY 1 value and the Location/Region
value to use Azure TTS in code. The value of
KEY 1 is assigned to the environment variable
SPEECH_KEY, and the value of Location/Region
is assigned to the SPEECH_REGION environment variable.
❸ We are now essentially ready to run the official Python example. The example code can be found on the following official tutorial page: Quickstart: Convert text to speech.
⓵ We need to install the “Microsoft Cognitive Services Speech SDK for Python”,
also known as
azure-cognitiveservices-speech, onto the active virtual environment,
venv. Please use the following command:
▶️Windows 10: (venv) F:\pydev>venv\Scripts\pip.exe install azure-cognitiveservices-speech
▶️Ubuntu 22.10: (venv) behai@hp-pavilion-15:~/pydev$ ./venv/bin/pip install azure-cognitiveservices-speech
⓶ We need to set the SPEECH_KEY and the SPEECH_REGION
environment variables for each console session, as recapped
above:
▶️Windows 10: (venv) F:\pydev>set SPEECH_KEY=<KEY 1 value>
▶️Ubuntu 22.10: (venv) behai@hp-pavilion-15:~/pydev$ export SPEECH_KEY="<KEY 1 value>"
▶️Windows 10: (venv) F:\pydev>set SPEECH_REGION=<Location/Region value>
▶️Ubuntu 22.10: (venv) behai@hp-pavilion-15:~/pydev$ export SPEECH_REGION="<Location/Region value>"
To verify that the environment variables have been set, use the following commands:
▶️Windows 10: (venv) F:\pydev>echo %SPEECH_KEY%
▶️Ubuntu 22.10: (venv) behai@hp-pavilion-15:~/pydev$ printenv SPEECH_KEY
▶️Windows 10: (venv) F:\pydev>echo %SPEECH_REGION%
▶️Ubuntu 22.10: (venv) behai@hp-pavilion-15:~/pydev$ printenv SPEECH_REGION
⓷ Copy the example code into the file named azure_speech_synthesis.py.
I am listing the code as it is:
Content of azure_speech_synthesis.py:
import os
import azure.cognitiveservices.speech as speechsdk

# This example requires environment variables named "SPEECH_KEY" and "SPEECH_REGION"
speech_config = speechsdk.SpeechConfig(subscription=os.environ.get('SPEECH_KEY'), region=os.environ.get('SPEECH_REGION'))
audio_config = speechsdk.audio.AudioOutputConfig(use_default_speaker=True)

# The neural multilingual voice can speak different languages based on the input text.
speech_config.speech_synthesis_voice_name='en-US-AvaMultilingualNeural'

speech_synthesizer = speechsdk.SpeechSynthesizer(speech_config=speech_config, audio_config=audio_config)

# Get text from the console and synthesize to the default speaker.
print("Enter some text that you want to speak >")
text = input()

speech_synthesis_result = speech_synthesizer.speak_text_async(text).get()

if speech_synthesis_result.reason == speechsdk.ResultReason.SynthesizingAudioCompleted:
    print("Speech synthesized for text [{}]".format(text))
elif speech_synthesis_result.reason == speechsdk.ResultReason.Canceled:
    cancellation_details = speech_synthesis_result.cancellation_details
    print("Speech synthesis canceled: {}".format(cancellation_details.reason))
    if cancellation_details.reason == speechsdk.CancellationReason.Error:
        if cancellation_details.error_details:
            print("Error details: {}".format(cancellation_details.error_details))
            print("Did you set the speech resource key and region values?")
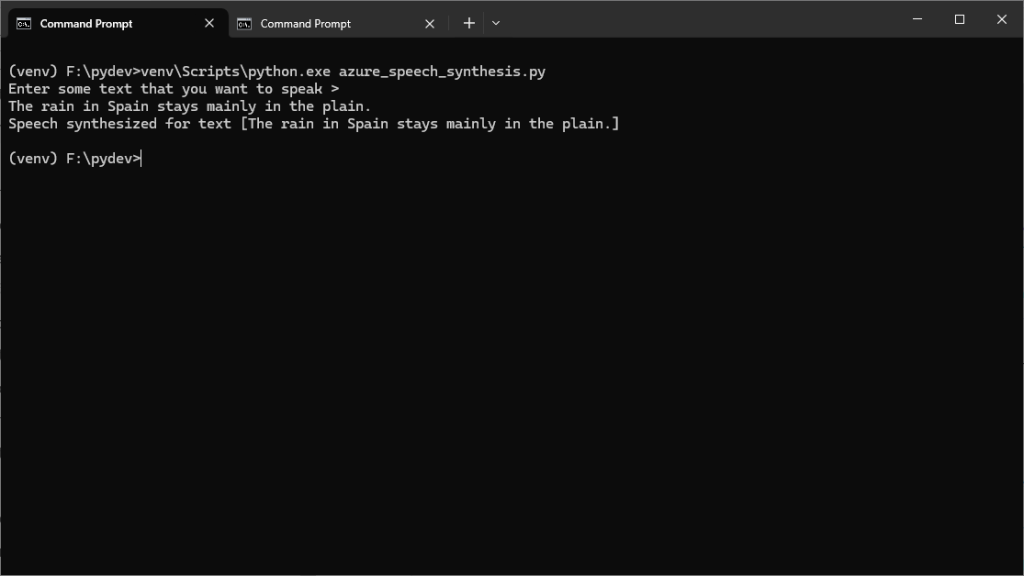
⓸ Let’s run the example as it is. The command to run is as follows:
▶️Windows 10: (venv) F:\pydev>venv\Scripts\python.exe azure_speech_synthesis.py
Since the voice in the example code is en-US-AvaMultilingualNeural,
enter some English text, for example,
The rain in Spain stays mainly in the plain.
Then hit the Enter key. We should hear the text being
read aloud through the machine’s default speaker. The console response
should look like the screenshot below:
⓹ Let’s save the audio into a file. For Line 6, we
replace the use_default_speaker=True parameter with
filename='azure_speech_synthesis.mp3':
speech_config = speechsdk.SpeechConfig(subscription=os.environ.get('SPEECH_KEY'), region=os.environ.get('SPEECH_REGION'))
audio_config = speechsdk.audio.AudioOutputConfig(filename='azure_speech_synthesis.mp3')

# The neural multilingual voice can speak different languages based on the input text.
speech_config.speech_synthesis_voice_name='en-US-AvaMultilingualNeural'

speech_synthesizer = speechsdk.SpeechSynthesizer(speech_config=speech_config, audio_config=audio_config)
Run it as described above.
After the program finishes running, we should have the audio file
azure_speech_synthesis.mp3 in the same folder as the Python source file.
⓺ Finally, let’s try a language other than English. All we have to do is replace
en-US-AvaMultilingualNeural with an available voice name.
The official page
Language and voice support for the Speech service
lists all available languages and voices. The data we are interested in is under the column
Text to speech voices. For example, for Vietnamese, we have two voices
vi-VN-HoaiMyNeural and vi-VN-NamMinhNeural.
For Line 9, let’s replace
en-US-AvaMultilingualNeural with vi-VN-HoaiMyNeural:
audio_config = speechsdk.audio.AudioOutputConfig(filename='azure_speech_synthesis.mp3')

# The neural multilingual voice can speak different languages based on the input text.
speech_config.speech_synthesis_voice_name='vi-VN-HoaiMyNeural'

speech_synthesizer = speechsdk.SpeechSynthesizer(speech_config=speech_config, audio_config=audio_config)
Run it as before. But this time, we have to input Vietnamese text. For example, Rải rác biên cương mồ viễn xứ.
▶️Ubuntu 22.10: (venv) behai@hp-pavilion-15:~/pydev$ ./venv/bin/python azure_speech_synthesis.py
The output is as illustrated in the screenshots below:


❹ Azure TTS has an extensive set of documentation. I have only read or skimmed through a few. Here is my list:
- You’re ready to start with Azure.
- Text to speech REST API.
- Text to speech documentation.
- Quickstart: Convert text to speech | Python: We have listed this page in this section.
❺ The primary reason for me to try Azure TTS is that it offers two
Southern Vietnamese voices, as described.
The Google Cloud Text-to-Speech API
also supports Vietnamese, but all the available voices are Northern.
I found the process of creating projects a bit confusing. However, we managed to do it. This post serves as a good reference document for me. I hope that exploring other Azure AI services will be a bit easier in the future.
Thank you for reading. I hope you find the information in this post useful. Stay safe, as always.
✿✿✿
Feature image source:
